Anaesthetic machine checks
The purpose of the machine check is:
- To test each component and assess whether it is suitable for use.
- To confirm that emergency equipment is available in case of unforsee circumstances
- To provide an understanding of the functions of the machine and help in developing strategies to deal with failures.
The evolution of 'automatatic self-checks' is useful in ensuring that there is a systematic and rigorous approach to the machine check. Unfortunately, it hinders us in understanding how the machine works and what to do in case of failure.
The current AAGBI checklist is here. Sadly, it is poorly conceived and although you will need to learn it for exam purposes, I intend to ignore it completely because it misses some of the fundamentals.
An approach to the machine

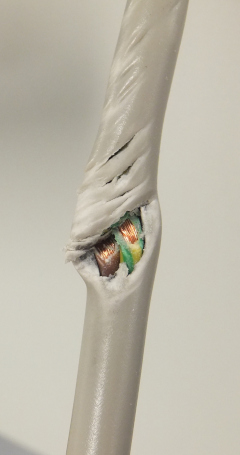
Remarkably, there was no short circuit, just no power.
If it uses electricity, then check that it is plugged in. Even with the machine switched off, there should be a power light which confirms that it is receiving power (never assume anything - Fig. 1) ! Where there is a battery backup, the indicator may also provide confirmation that the battery is charged.
Switch the machine on. The switch may be electrical, pneumatic or both, but it can be impossible to determine this. Regardless, the machine should now be able to function and is ready to be checked.
Calibrate the oxygen analyser on air. You now have a fixed, 21% reference, independent of any errors in the gas supply.
Check that all of the gas and vacuum hoses are connected to the wall and turn all of the flow-meters to their half-way position.
Now disconnect all of the gas pipelines and watch all of the flows fall to zero. The oxygen failure alarm must sound. If any gases continue, then either a hose is still connected or a cylinder is turned on. Fix the problem so that all gases are off.
Now turn on the oxygen cylinder. Check the cylinder pressure is acceptable. The oxygen flow-meter should confirm a flow, but it should be a little less than you set. The oxygen analyser should show 100%, but it may not as it has only had a one-point calibration at 21%. If it is not showing 100%, then perform a 100% calibration.
If there are additional cylinders, you can check these one by one, but conclude by turning off all of the cylinders in reverse order, confirming that the flows and cyclinder pressure guages fall to zero; the oxygen failure alarm must sound.
Plug in the oxygen hose. The oxygen failure alarm should silence. Check the line pressure guage which should show 4 bar. Confirm that the flow-meter is at half-range and that the oxygen analyser shows 100% (we now have two entirely different gas sources which we believe to be oxygen and which show 100% on the analyser - were there to be a significant descrpency, then be suspicious that something is amiss with one of the two supplies (it has happened [1,2,3]).
Plug in the nitrous hose (if available). Check the line pressure guage shows 4 bar and that the flow-meter is at half-range. Now we get another chance to cross check the analyser - if we have 7.5l of oxygen and 5l of nitrous oxide, then the analyser should show 60%.
Plug in the air hose. Again check the flow-meter and pressure guage and do a quick check that the oxygen analyser if indicating a sensible value.
Plug in the vacuum and scavenging hoses.
Check that manual ventilation is selected (bag), close the APL valve and occlude the circuit. You will see the circuit pressure staring to rise rapidly. Turn the oxygen off. As the oxygen flow-rate falls, any nitrous oxide should decrease to zero (interlock). Turn on the nitrous oxide, watching the oxygen flow rise (interlock). Again, turn off the oxygen (nitrous will follow) and finally turn off the air. Check the curcuit pressure and allow gas to leak to achieve a pressure of 40cm of water. Check that this pressure remains stable (i.e. no leak). If there is a leak, turn up the oxygen flow until a stable pressure of 40cm can be maintained - you now have a measure of exactly how much gas is leaking from the manual circuit at 40cm H20. Turn off all flows. Open the APL valve and confirm that the circuit pressure falls to zero.
With the circuit still occluded , switch to the ventilated circuit, filling the bellows as required. Set a PEEP of 10. Whilst the ventilator is running, turn each vaporizer on to maximum and then turn it off, checking that they are adequately filled. Check that suction is available and when the line is occluded it achieves at least 400kPa. Check the auxilliary oxygen outlet functions and can deliver adequate flow. Check that the bellows has not collapsed (i.e. no leak).
Finally, check emergency equipment is available.

